LESSON 3
Making Things for 3D Printing
In this unit we explore the best practices for designing and printing a 3D model.
3D Modeling Software
In order to 3D print an object, you will first need a digital file of an object. Digital 3D files are created using computer aided design programs, or CAD software. There is a plethora of free and paid software options available for 3D modeling, ranging from total beginner to rocket scientist. Here is a list of some of our favorites, ranked from beginner to expert.
| Software | Difficultly | Description | Cost |
|---|---|---|---|
| TinkerCAD | Beginner | An easy-to-use 3D CAD design tool. Quickly turn your idea into a CAD model for a 3D printer with Tinkercad. | Free |
| PlastiSketch | Beginner | A 3D modeling tool that runs in your browser. Use this to make artistic 3D models by using simple vector shapes. | Free |
| OpenSCAD | Intermediate | A free software application for creating solid 3D CAD objects. It is a script-only based modeling program that uses its own description language. | Free |
| SketchUp | Intermediate | A 3D modeling computer program for a wide range of drawing applications such as architectural, interior design, landscape architecture, civil and mechanical engineering, film and video game design. | Free |
| OnShape | Expert | A fully fledged web browser-based CAD modeling program. | Paid |
| Fusion360 | Expert | A fully fledged cloud based CAD modeling for design, engineering, and manufacturing. | Paid |
| Blender | Expert | An interactive and open-source modeling program for video editing, rendering, animation, 3D modeling, and much more. | Free |
The interface and tools of each CAD modeling software is unique and has its own learning curve. We recommend trying out several different softwares to get a sense for what works for you. Even the most basic of modeling programs can create complex objects with a little bit of creativity and effort. There are great tutorials on how to use all these different programs on the internet, if you are interested in learning one do a search for instructions.
Modeling for 3D Printing
So you have selected a 3D modeling software, worked through some tutorials, know how to use the different tools and functions, and are ready to make a model to 3D print. While your Buildini™ 3D printer can print an endless variety of shapes, there are some objects that it will not be able to print based on the physics involved.
The position of an object on the build platform can have a dramatic impact on the end result of the print. Orientation of your print impacts print time, success, accuracy, and strength of your print. Orient your model so a flat surface is facing down on the build platform. This will be the first layer of your 3D printed object. Proper adhesion to the build plate is critical to a successful print.
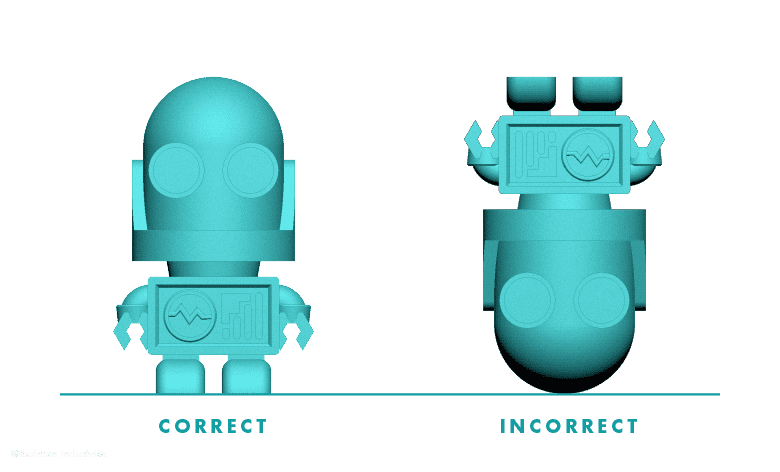 Dudlee our robot showing you to 3D print with flat bottom surface.
As the Buildini™ prints, every new printed layer is ideally supported by the previous layer of material. However, if the object has a cantilever or a large arch with no material underneath, gravity will interfere and cause print issues. Design elements where a portion of the object is suspended unsupported are called overhangs, bridges, or negative space.
When designing an object with overhangs, bridges, and other unsupported features, it is important to consider the 45° Rule.
45° Rule An overhanging feature of a 3D model printed at 45° or less will print self supported.
In the example below we see what happens when we exceed the 45° on an overhang, the wall will droop and have print errors because the layers no longer self support.
 Diagram of 45° measurement from Build Platform along 3D printed layers.
The 45° rule may seem like a limitation of the 3D printing process. However, when this is looked at as a creative constraint rather than a limitation, this unique ability to print unsupported 45° overhangs allows 3D printers to produce working objects that could not be manufactured through other methods.
It is important to understand that a 3D printer can print an object with a bridge or overhang exceeding 45° but it will require support material which increases time, material and often diminishes surface quality. With that in mind, it is best to design your object to print without support material if possible. We will cover support material in depth in the next module as we prepare our model for 3D printing.
Click here to go to Lesson 4: Preparing your Model for 3D PrintingVocab Words
- Additive Manufacturing: The process by which digital design data is used to build a three-dimensional object by depositing layers of material.
- Build Platform: The surface where an object is 3D printed. Also called build plate or bed.
- Computer Aided Design (CAD): Software used to design a three-dimensional object.
- Support: Removable and discarded 3D printed material used to successfully fabricate overhangs, bridges, and negative space.